The
Jazz Screen Editor
Getting Started – Creating a New
Screen
Placing
individual fields on the screen
Placing
Records and Groups on to the Screen
Selecting
Fields from a Definition
Screen
Fields, Attribute Bytes, and Line Boundaries
Selecting
and Deleting or Moving Fields
Scrolling
Areas and Parent-Child Record
Structures
If we’re
writing a CICS program, or we open a screen object (extension .JZS) then the
Jazz screen editor opens and we can create or edit a screen, placing fields
where we want and defining their appearance as we define the program’s
processing logic.
Getting
Started – Creating a New Screen
Screens and
programs are closely related: the fields that are on a screen must be known
within a program, and it is the definitions that are common to both screen and
program that define the format and validation rules of each field. The Jazz Screen Editor is designed to be used
from a program, and when we want to create a new screen we start by starting to
write the program that will interact with it.
For example,

Now we
click [Screen], which opens the screen editor to create the screen
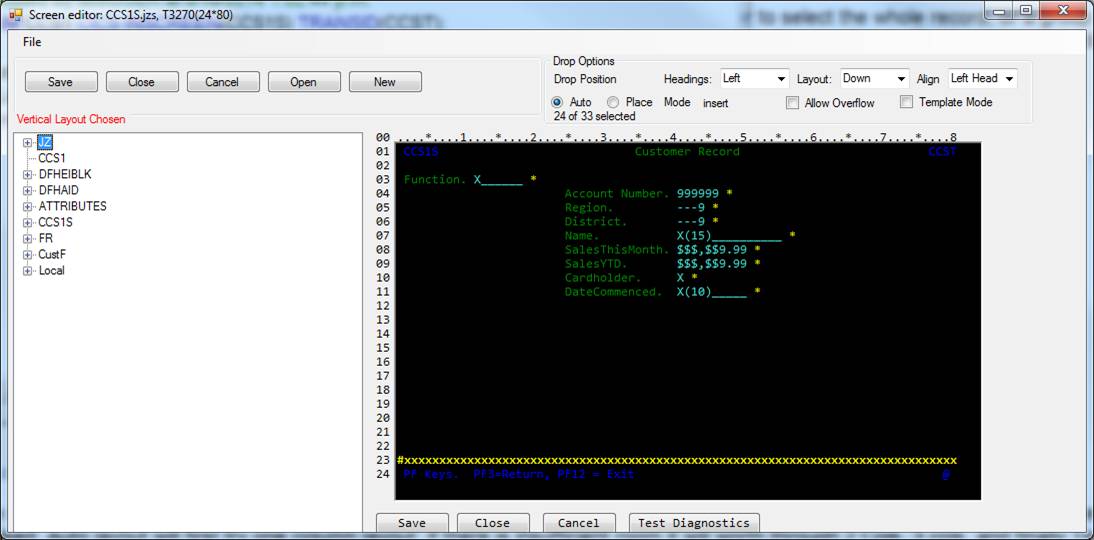
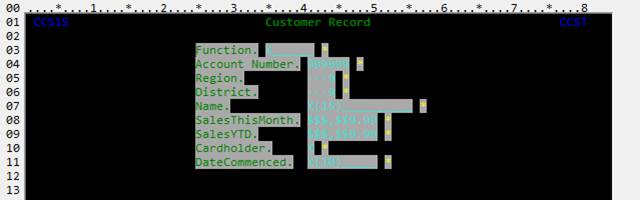
“CCSIS”. The screen editor responds
with: -
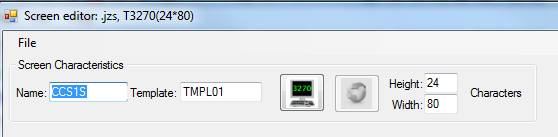
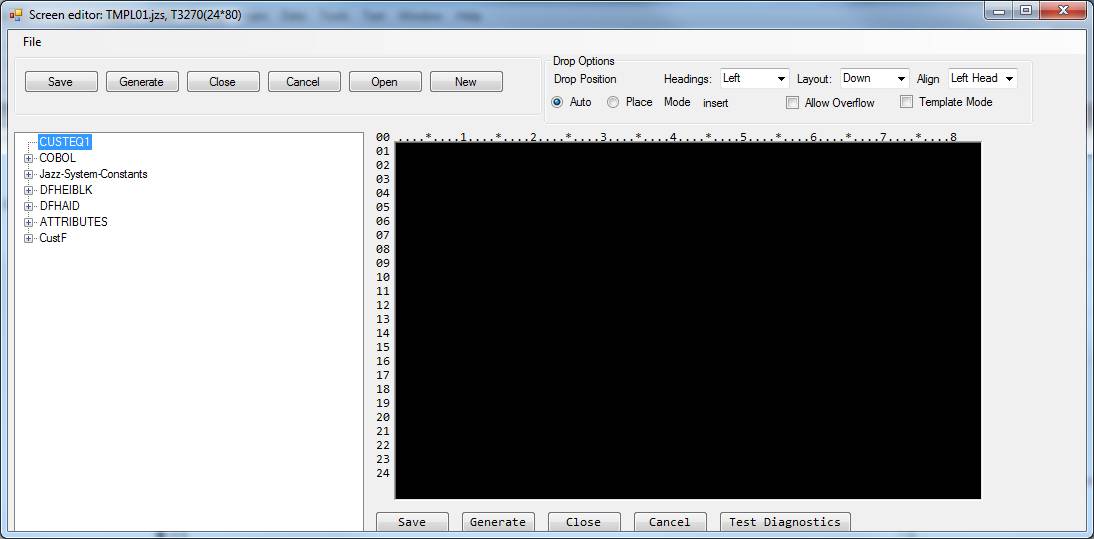
The screen name is filled in from the INSCREEN option, and the name of the last template that we used is displayed (first time: installation default). Change any defaults that we don’t like and click the tab key [->|] or click the 3270 icon (Web and Windows forms are planned for future Jazz Releases). The screen editor reads the template and creates an initial screen like this: -
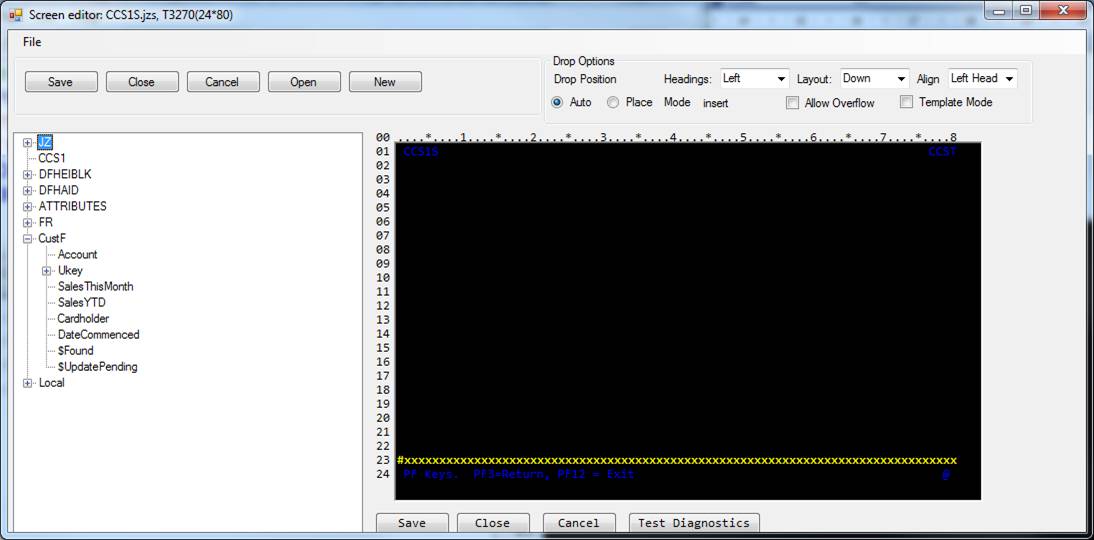
The left hand panel shows the records that have been defined within our program, including system definitions like DFHEIBLK and DFHAID, which we will ignore. More useful is the definition for CustF, our input file, which I’ve expanded by clicking the [+]. The right hand panel is our screen. A few fields are already given from our template: there is a standard error-message field called ERROR on the 2nd-to-last line of the screen, and the bottom line shows major PF key assignments that we want to tell the user about. The screen name has been put in the top left corner of the screen, and the transaction id at the top right because the template contained parameters @Screen and @Trn.
We can now edit the screen, typing text anywhere where there isn’t something already, dragging the items already there to new locations, and editing any text placed on the screen. At any time we can click [Save], [Close] or [Cancel] to close the screen editor and return to the program, and we can return to the last-saved screen at any time to edit it further.
Editing the screen
Entering Text
Simply type text anywhere where there isn’t already existing text or a field. You will not be permitted to overwrite another object, including its preceding control character. The typed text will be displayed in green, indicating that it is only text: it will be generated into the physical map, but is not processed in the program.
Example: here we’ve typed “Customer Record” starting in column 35
![]()
Text can be changed simply by clicking anywhere within it and overtyping.
Placing individual fields on the screen
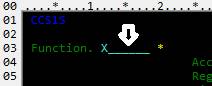
Expand the record definition (click the [+]) and select the field you want. Drag this to the required position on the screen, and drop it. The field’s heading, its data area, and an error indicator are dropped on to the screen. For example, here we’ve dropped Local.Function on to line 3, column 1: -

At the top of the screen editor there are a group of controls labelled “Drop Options”. The first of these determines where the field’s heading will be placed when we drop a field. In the absence of any HEADING option the field name is used as its heading.
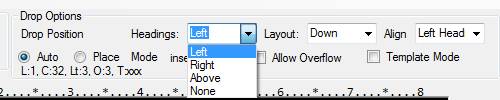
In this example this option has been left at its default, “Left”.
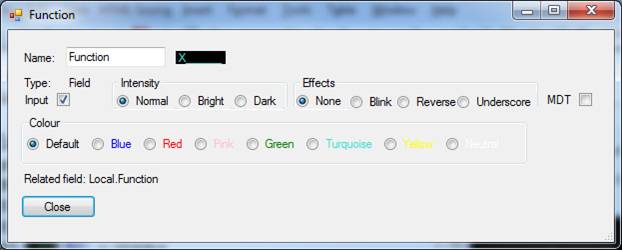
Function was defined: -

The value will be entered as a single character “A”, “E”, “U”, or “D”, but will be reflected as “add”, “enquire” etc, so there is sufficient space for this. Following the data area there is a single-character error indicator: when Function is validated then if it is invalid this will appear, and a descriptive error message will be put into the ERROR field at the bottom of the screen.
Note that we dragged a single field, but Jazz has created three screen fields, the heading, data, and error-indicator. Each field is preceded by a single-byte attribute code.
Placing Records and Groups on to the Screen
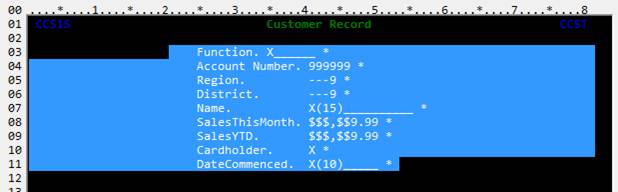
We can select each field individually and drop it where we want on the screen, but it is far easier to select the whole record, or a group of fields within the record layout, and drop this anywhere on its first line. Thus we drag and drop “Custf” to somewhere on line 4. The system responds with
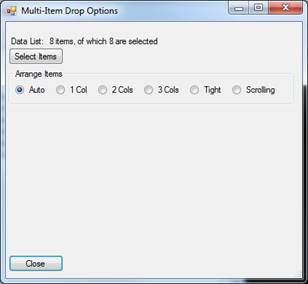
Leaving the default of “Auto” we click [Close], and the system arranges the eight data fields (ignoring $Found and $UpdatePending) vertically aligned and centralised. Auto layout will first try one column layout: if there is insufficient room it will worth through 2 Cols, 3 cols, and finally Tight. Here, with only eight fields to arrange, there is plenty of room for one-column layout: -
If we’d chosen 2 Cols, the record would have been laid out like this: -

There’s insufficient room with this record to use 3 Cols layout. Tight layout puts as much data on each line as it can without splitting the heading/data/error-indicator triplets: -

If, even with tight layout, the data cannot be put on to the screen from the drop position to the error line then you may need to drop each field individually and edit their headings.
See below to find out about scrolling layout.
Selecting Fields from a Definition
We may not want to put all the fields from a record or group into our screen. Choosing a subset is simple: we click [Select Items] on the form above. Jazz responds with a list of all the possible fields and groups.

Uncheck the fields that we don’t want and click [Finish]. Clicking [Close] on the multi-item drop form now drops only the items that we’ve left checked.
What if we want to add a field that is not defined in our program?
You’re defining your screen and you want to add a field, say “Function code”, that is not defined in your program. You can’t. What you do is: -
· Click [Save] to save the screen so far and return to the Jazz Workbench.
· Add the definition to your program, either by including a COPY statement, or by directly writing a DEFINE statement.
· Click [Check] so that Jazz processes your program again, checking your new DEFINE statement and putting the new data into the data list.
· Click [Screen] to return to the screen editor. The new data will now appear in the record list at the left of the screen, and you can drag-and-drop the new field just like any other.
3270 Screen Fields
Once a field has been dropped on to a screen (individually or as part of a group), you can edit it: move it around, delete it, and change its attributes. Before we start doing this, we should understand a little about the structure of a 3270 screen. 3270 terminals date from ~ 1970, when line and computer speeds were much lower than today and so computer efficiency was a much higher priority relative to user efficiency than it is today. 3270s are designed to transmit only the minimum necessary to achieve their function, so while changed fields are transmitted to/from your program unchanged fields and the dark space between the fields are not.
When we drop a Jazz field on to a screen we create two or three screen fields: optionally the heading, a data field, and an error-indicator field. When we type text we create a single screen field. Each screen field whether a data field like Function or a constant like “Customer Record”, has a type, position, length, and various attributes. There is nothing between the fields. We can enter text anywhere within the unused part of the screen, and we can edit any existing constant by typing over it. However we cannot drop data over an existing field, nor can we type a constant that overlaps another field (whether a constant or data field). Using the Delete and Backspace keys in the empty part of the screen does nothing: the following fields are not moved.
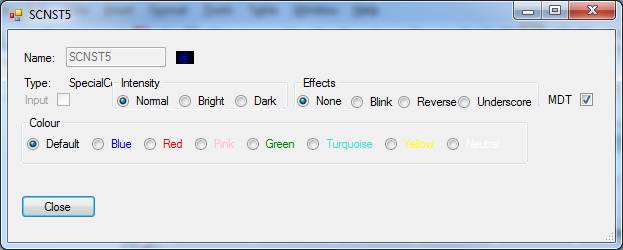
Right-click any field on the screen and you can see the characteristics of the field. We’ve right-clicked here: -
to display this result: -
Screen-field values are: -
·
Name.
This is the name within the screen: for example within your program you
could refer to this field as CCS1S.Function. You are unlikely to want to change the name
that Jazz has used. If this field is a constant then it will have a name like
“CNST6” and you’ll be unable to change it, or refer to it from your program.
·
Type. You
cannot change this: if the field is the wrong type, delete it and create
another. Type will be one of the following: -
o Constant
o Special Constant This is used for template fields like the screen name, program name, and transaction code
o Field A normal field: values may be sent to and from the program
o Screen Field Mainly used for error fields
o Output Field Used in scrolling sections. Data can be sent to the field, but it will be protected and no value will be returned
o Group Used to mark the beginning and end of a scrolling section, and to carry dimension
o Repeating Line Scrolling: used for screen display, but not generated into the layout or map. Cannot be referenced in your Jazz program
o Hidden Field Scrolling: used for fields that are not displayed.
· Input Not relevant for constants. For fields, if unchecked, this is an output field.
· Intensity, Effects, Colour. You can choose one of the options. Use Dark for password fields and other fields that may be sent to and from the screen but will not be seen by the user. Default colours are: -
o Constant Green
o Special Constant Blue
o Field Turquoise
o Screen Field Yellow
o Output Field
· MDT. If this is checked then the value in the field will be returned whether or not the user enters anything into the field. You can pass data from one program to another via a screen by using a dark field with MDT checked.
Screen Fields, Attribute Bytes, and Line Boundaries
Each screen field is preceded by a single hexadecimal character called an Attribute Byte that gives some information about the field such as whether it can receive input, whether this must be numeric, etc. This character takes up space in our screen layout, so that you’ll see that the first screen field appears to start on line 1 column 2, not column 2, and there is always at least one space between adjacent fields.
We are used to thinking of 3270-type screens as lines and columns: most commonly 24 lines of 80 characters. However the screen is actually a continuous area and so we can place a field starting in column 1 of any line except the first: the attribute byte is effectively at position 81 of the preceding line. Also we can drop a field on to a screen that is longer than 80 characters provided that we check Allow Overflow in the controls at the top to tell the editor that this is not an error.
Selecting and Deleting or Moving Fields
To select a field, double-click it. For example, here I’ve double-clicked within the heading, “Customer Record”

Click Delete to remove the field.
To move the field, click again and drag the field to its new position. The new position is calculated by the distance that you’ve moved the cursor. Dropping the field where you want it is easier if you click at the beginning of the field than somewhere within it. Fields can only be dropped where there is room, so you cannot drop a field, or group of fields, on top of another field.
To move or delete a group of fields, such as this group of three fields you can move each individually, but it’s easier to move them as a unit: -
![]()
To move them as a unit you need to select all three fields before you start the move. There are two ways of doing this, you can select the fields individually, or you can select all the fields in a screen area. To select the fields individually, select the first one, then holding down ctrl click the others that you want to add to the selection: -
![]()
Now the group of three fields is moved or deleted as a unit. Remember that it’s a lot easier to drop the field where you want if you drag the “F” of “Function” rather than have the cursor positioned at some random part of the group: -

Now we’ll move the data field and error-indicator field to align them with the value of Account Number, leaving the heading where we’ve dropped it.
To select all the fields in a screen area drag the cursor across the area. It doesn’t matter whether you do this top-to-bottom or bottom-to-top, or how much empty space you include: -
Now ctrl-click any field within this. Again, it makes dropping easier if we click right at the beginning, on the “F” of “Function”: -
These fields can now be deleted or dragged as a unit.
Scrolling
Areas and Parent-Child Record Structures
A very common
requirement is to show a variable length table that the user can scroll up and down
with Page UP and Page Down (or PF7/PF8).
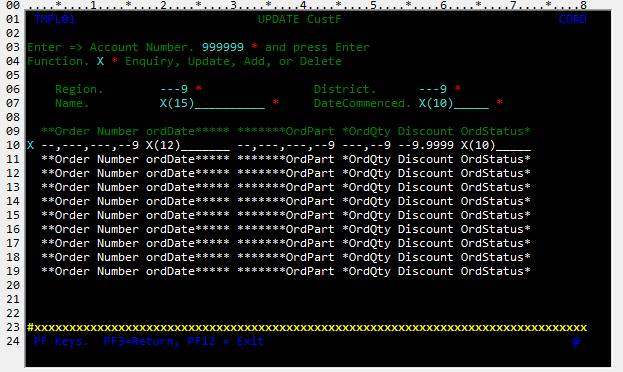
For example, suppose we want to display a screen like this: -
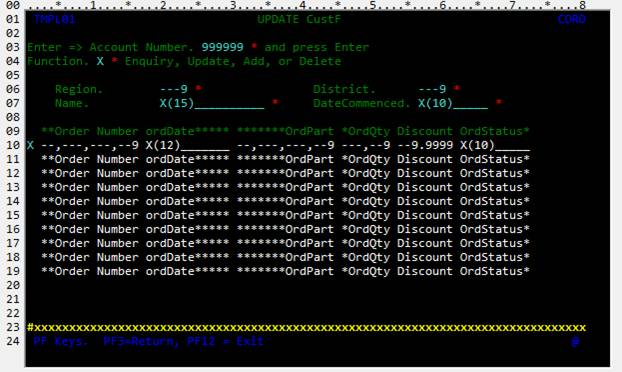
Basing this on the
previous example, the first part of the screen can update or create a CustF record,
although in this case only a few of its fields. Then comes a scrolling section,
where up to 10 order lines can be displayed.
You can do something with one of the orders – show it in more detail,
add a new order, update it, process it (this might mean “dispatch it and
invoice the customer”), delete it (subject to various rules), and so on. Such a screen has to be coordinated with the
program logic to handle the paging, and you might like to read this chapter of the Users’ guide where both the screen
above and its program are developed.
Here we are concerned only with the screen editing as we create a
scrolling section.
First we create the
upper section of the form where the parent (=Custf) record is displayed. This uses the techniques covered above and so does not need to
be illustrated again. Now we come to
create the scrolling section.
Our example Orders
record is defined like this:-
*# Last Updated by robertb at 10/01/2014
2:57:18 p.m.
COPY Custf;
DEFINE Orders TYPE(VSAM) DATA(
OrdNbr INTEGER KEY HEADING 'Order Number',
OrdCustId LIKE custf.account DKEY
OrdCust,
ordDate DATE,
OrdPart INTEGER,
OrdQty SMALLINT,
OrdDiscount DECIMAL (6,4) HEADING 'Order Discount',
OrdField1 SMALLINT,
OrdField2 SMALLINT,
OrdStatus CHAR(10));
and our program includes COPY Orders; so that the Orders
record is included in the data list. We
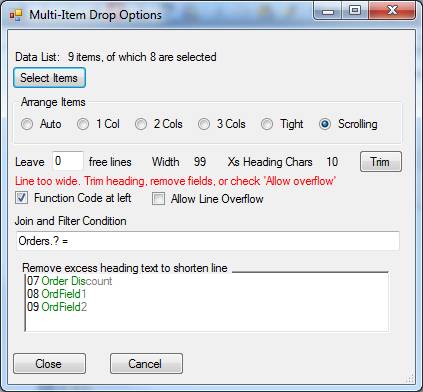
drag Orders to line 9, where we want the scrolling section to start. The Multi-Item
Drop Options form is displayed, and we click Scrolling
layout. The form responds like this: -
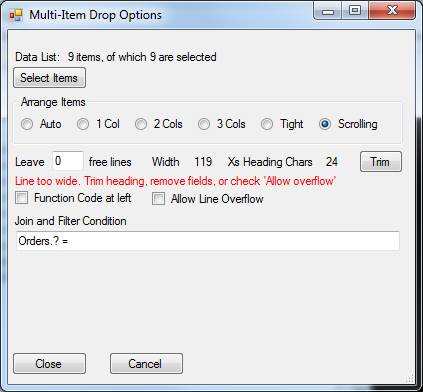
Note that if we simply click [Close] now we’ll be
attempting to create a line of 119 characters, more than the 80 characters
maximum width. This will not be permitted unless we check Allow Line Overflow.
More likely, we’ll want to reduce the line size by selecting which fields we
want, and/or by shortening over-long headings.
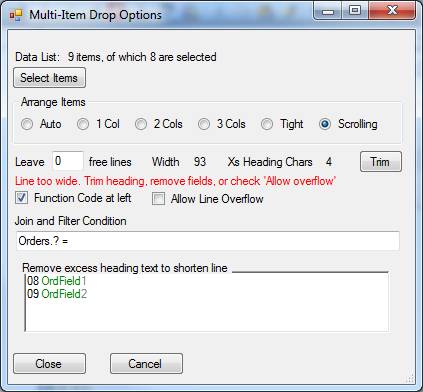
1.
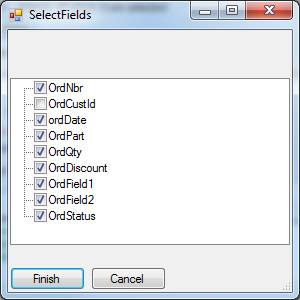
Click [Select fields] and choose the
fields that we want to have displayed across the line. We don’t want to display the field OrdCustId
which will always have the same value as CustID in the CustF record, and there may
be other fields that we don’t want either.
2.
This has reduced the line size to 97, but
it’s still too long. Besides, we want a function code on each line and when we
check “Function code at left” the line size goes up to 99.
3.
We can shorten the line by removing excess
heading characters. Whereas the previous
layout options had put the heading to the right of the data field, with
scrolling layout they are placed as column headings as in a report. If necessary, click [Trim] to show the fields
in the scrolling layout that have longer headings than data areas, with the
green section showing the length of the data area (this panel may appear
automatically, as it has here). Thus the
entry Order
Discount
indicates that this field needs only 9 characters of data space, whereas the
heading currently takes 14 characters. You can change it by retyping or
deleting excess characters (click on Order Discount and then delete, backspace, or type
other characters). The entry will disappear when the heading is as short as the
data.
However the line is still too long,
and there are only four excess characters so we can’t get it down to 80
characters by trimming more headings. We must either check allow line overflow
which means that the scrolling section will take two or more rows per record,
or we must remove other fields that we don’t want. In this example we’ve removed fields
OrdField1 and Ordfield2.
4.
Complete the form by specifying how many
free lines we want left after the scrolling section, and the condition that
relates the parent and child records.
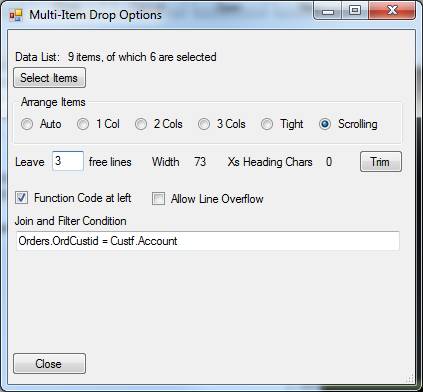
5.
Click [Close] and Jazz adds the repeating
section to the screen. The first line of
the scrolling section is shown as data formats, the remainder repeats the
heading.
6.
On saving the screen and returning to our
program, we’ll find that Jazz has inserted a definition for the Temporary
Storage Queue to hold the scrolling results: -
DEFINE TS TYPE(TS) DATA(
JZGRP GROUP,
OrdNbr
LIKE Orders.OrdNbr,
ordDate
LIKE Orders.ordDate,
OrdPart
LIKE Orders.OrdPart,
OrdQty
LIKE Orders.OrdQty,
OrdDiscount
LIKE Orders.OrdDiscount,
OrdStatus
LIKE Orders.OrdStatus,
Line-Function
LIKE CCS1S.Function,
END GROUP);
Function Buttons
Save
Saves the screen. When the screen is saved, three objects are created and saved in the local Jazz Copy library: -
· xxx.jzs This is an XML description of the screen, containing information required to recreate the screen layout and to relate the fields on it to fields in the program.
· xxx.jzm This is the physical map – an Assembler-language description of the screen with assembly options to create the CICS physical map
· xxx.jzc This is a DEFINE statement that can be used by Jazz to get the record description (“symbolic map”) to address the fields used by the Jazz program. On return from the screen editor Jazz will have inserted COPY xxx into the program.
As part of the Save process the physical map assembly is submitted to your zOS system, and you’ll see the various FTP messages appearing at the bottom of the workbench as the physical map is compiled into your CICS load library.
Close
Checks if the screen is “dirty”, i.e. has been edited. If yes, it is saved (see above). The screen editor is then closed.
Cancel
The screen editor is closed without saving.
Open
You can browse for and open a previously-written screen, i.e. an object with extension .jzs.
New
Create a new screen object, starting with a template. This is intended for situations where a program uses SEND xxxx and you want to create screen xxxx.
Templates
When you created a new screen the screen editor
started with a template, and Jazz provided template TMPL01 with installation.
You may want to change this, or create more templates. Creating and editing a
template is essentially the same as creating and editing any other screen, with
only a few minor differences.
To create a new template set the template’s
name in the screen name position, and you will probably put “*” in the template
name, although you could put the name of an earlier template or indeed the name
of any previously-created Jazz 3270-type screen. Here we have give the screen name as TMPL01,
and set the template name to “*”. The Jazz screen editor then opens with a blank
editing pane: -
Check “Template
mode” in the panel “Dropbox Options”.
This will allow you to leave text like @Program in the “screen”,
otherwise this text would be substituted with its current value (like
“CUSTEQ1”). Apart from this, there are
no differences between template editing and normal screen editing.
Commonly
templates use the top corners and the bottom two lines of a screen. In creating the template TMPL01 these rules
were followed.
1.
We’ve
put @Screen and @TRN on the first line: these are parameters that will be
substituted when the template is used.
See below for a list of parameters that can be used. You don’t have to use any of these.
2.
Every
Jazz screen must have a field called “Error” for messages: it obviously makes
sense to include this in the template.
We put this on line 23. After
creating the field by typing “#xxxxxx…” to the width of the screen we then
right-clicked this item and edit it, changing its name to “Error” and making it
Yellow and Bright. 
3.
At
the end of the screen we’ve placed a special constant with value “@”, and then
set MDT on for this field. This will ensure that at least one item is received
whenever the program reads any screen using this template, avoiding a potential
CICS error.
Template Parameters
The following parameter names may be written
into special text (text starting with “@”), and will later be replaced with an
appropriate value.
|
Parameter Name |
When replaced |
Meaning |
|
@Program |
When screen is edited |
Program name: taken from the PROGRAM
statement |
|
@Screen |
When screen is edited |
Screen name: taken from the INSCREEN option
of the PROGRAM Statement |
|
@TRN |
When screen is edited |
Taken from the TRANSID option of the PROGRAM
statement |
|
@Date |
When screen is displayed |
Today’s date |
|
@Time |
When screen is displayed |
Time now |